Text & Fonts
There are two way to add text in Indigo, each with their own set of trade offs.
TextBox- is text as you'd expect it, easy to use and with full font support, but is generally lower quality.Text- is a graphical primitive that gives high rendering fidelity but requires a lot of set up.
If you're new to Indigo and just want to get some text on the screen quickly, you are strongly advised to use a TextBox.
TextBox
This is a new feature and there are bound to be issues with it. Please report any problems you find.
The TextBox primitive works by utilising the browsers ability to render fonts. This provides a huge amount of power and flexibility, but it also inherits the shortcomings of that process, which chiefly are:
- There is no way to disable anti-aliasing, which means that text being shown on a magnified pixelated layer is likely to look poor. (On the other hand, on a nice HD UI layer your text will look crisp!)
- There is no inbuilt support for multi-line text, and measuring text has some cost associated with it. We may try to add wrapping in the future, but for now if you want to wrap text you'll need to do measure the text using the
BoundaryLocator, and insert line breaks manually.
However by comparison to the Text primitive, getting up and running with TextBox is far quicker and easier because there is no set up to do.
Loading a font
You can use system fonts, but if you're keen on using something specific then there is a new Font AssetType, which works the same as loading any other kind of asset:
import indigo.*

AssetType.Font(AssetName("My Font"), AssetPath("assets/my-favourite-font.woff2"))
And is used as follows:
// FontFamily("My Font") aligns to the loaded asset name AssetName("My Font")
TextBox("Indigo... with fonts?", 200, 30).withFontFamily(FontFamily("My Font"))
There are things to be aware of with fonts, but the rules for fonts in Indigo are identical to the rules for loading fonts into browsers generally.
Using a TextBox
As with all the APIs in Indigo, the available features of the TextBox type are all easily discoverable via your favorite IDE, but here is an example to get you started:
TextBox("Hello, World!", 200, 30)
  .withFontFamily(FontFamily.cursive)
  .withColor(RGBA.White)
  .withFontSize(Pixels(16))
  .withStroke(TextStroke(RGBA.Red, Pixels(1)))
  .italic
.alignRightThe Text Primitive
The alternative to TextBox is the Text primitive, which renders text using what are known as bitmap fonts, i.e, an image containing all the characters and data structure explaining where they are.
You can create a Text node using one of it's constructors and manipulate its properties with fluent API methods like this:
Text("Hello, world!\nThis is some text!", FontKey("my font"), Material.Bitmap(AssetName("my font sheet"))).alignRightEasy enough, and note that you can use newlines ...but if indigo doesn't support fonts for Text, what is the fontKey in reference to?
Allowing fonts without supporting fonts
A very early design decision from back when Indigo was ruthlessly focused on the pixel art market, was that we didn't need real font support. Pixel art fonts tend to be blocky and mono-space.
Inspiration came from early versions of Flash where selected font glyphs were rendered into images at specific sizes during the Flash build. We went one step further and decided, in the name of not getting bogged down in the world of font rendering, that you'd have to provide your font glyph images - not unlike an animation sprite sheet - pre-rendered and then tell us where all the characters were.
It's inconvenient and a bit simplistic, but it works, and the results look good even when magnified for pixel art!
Setting up fonts manually
At the beginning of your (IndigoSandbox) game definition, you were given a couple of blanks to fill in that looked like this:
val fonts: Set[FontInfo] =
  Set()

val assets: Set[AssetType] =
  Set()
What you need to do, one way or another, is provide an image that represents your font characters, and the FontInfo that tells indigo how to render each character.
The image might look like this:
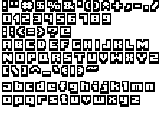
Which you would load in the usual way:
import indigo.*

val imageAsset = AssetName("my font image")

val assets: Set[AssetType] =
  Set(AssetType.Image(imageAsset, AssetPath("assets/my-font.png")))
And the associated FontInfo definition would be as follows, where the FontChar contains the character to match, and an image crop rectangle:
val fontKey: FontKey = FontKey("my font")

val fontInfo: FontInfo =
  FontInfo(fontKey, 320, 230, FontChar("?", 47, 26, 11, 12))
    .addChar(FontChar("A", 2, 39, 10, 12))
    .addChar(FontChar("B", 14, 39, 9, 12))
    .addChar(FontChar("C", 25, 39, 10, 12))
    .addChar(FontChar("D", 37, 39, 9, 12))
    .addChar(FontChar("E", 49, 39, 9, 12))
    // etc.
The eagle eyed among you may have noticed two things:
- That our
fontKeyhas appeared, and it ties theTextprimitive to a specificFontInfoinstance. - The "character" to match is represented by a
Stringrather than aChar... this is because of the way JavaScript represents it, an implementation leak if you will.
That all works fine, it's just a very boring job.